
Good day everyone, this is Grey’s resident build-monkey and editor today with a special guest review for you all.
Recently Grey managed to get his paws on the new Horus Heresy: Age of Darkness box set at release, and as is to be expected it is indeed a thing of beauty. The weighty box itself is something to behold, and once you’ve managed to dive through the copious amount of sprue to get to the bottom you’re greeted with some glorious books to assist you with playing this latest instalment in the Warhammer universe.

Among the sprues you receive the parts for 1 Praetor with Power Axe, 1 Praetor with Power Sword, 40 of the new MKVI Marines, 10 Cataphractii Terminators, 1 Contemptor Dreadnought, and the brand new plastic Spartan Assault Tank, which is going to be the focus of the day as I take you through the process of my building this behemoth, and my thoughts on it compared to other vehicles I have put together in the past.

After digging out the right sprues from the box one of the first things I noticed about them before even looking at the build instructions was the numbers on the sprues. There are many vehicles I have built in the past that have been “picture instruction only” (and the Rhino immediately comes to mind), so there had been a degree of guesswork to what I am putting where, which was particularly frustrating when I had first begun my foray into the world of Warhammer and couldn’t tell certain parts appart from one another from the grainy pictures printed in the build guide. It worked out in the end, but I couldn't help lamenting why they would give you clear instructions for one thing, but such vague ones for others. It’s really lazy in my opinion (but then again, this isn’t really a new sentiment where Games Workshop are concerned).


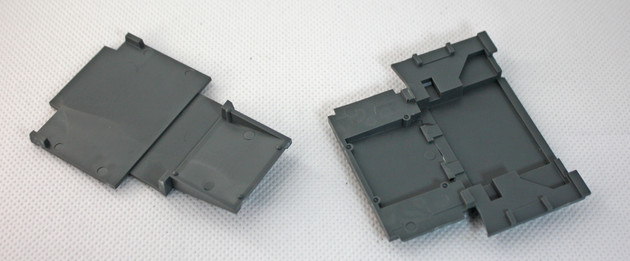
I started the build, as expected, with the suggested order in the guide, cutting out the pieces of one of the sides of the Spartan and cleaning off all the flash. I could already feel the sense of bulk from this model as I held the pieces in my hands, and fitting the pieces together to be glued was a dream; each of the pieces had a little tab of plastic, not just a nub and ball joint but an actual little extra piece off the side to really make the joint secure. It almost felt like a bit of a ‘plug and play’ moment, which left me really feeling like Games Workshop had put some thought into this build, giving you peace of mind that you have some proper reinforcement behind each of the parts of your model.


Once both sides had been glued together I moved onto the main body of the Spartan, which to my surprise again was a simple matter of glueing one piece quite literally flat onto another and so on and so forth, which was a breath of fresh air from something such as the Rhino’s flimsy panels that have to be slotted into awkward place that doesn’t completely fit as you think it should. And again, each piece just felt so solid in my hands as I was putting it together.


It was at this point though that I came to put the roof of the Spartan together, and while digging through the sprues to find the right parts I discovered something that at one moment surprised me, but at the same time didn’t at all, because, Games Workshop…
Only one of the sprues was labelled as “Spartan”. The rest were either labelled as “Land Raider “, “Tank Accessory”, or not named at all. Tank accessory I can understand, as to a degree the Land Raider label (as this tank is technically called the “Land Raider Spartan”).

It gives the impression that there’s something missing here, and there has recently been a rumour circulating about the development of the “Land Raider Proteus”. Currently it’s only a model available through Forgeworld, but there are clear pictures of the Proteus alongside the Spartan in the rulebook for the Horus Heresy Liber Astartes book. The picture shows some striking comparisons to the Forgeworld model, as well as the Spartan itself, albeit a little shorter in length. So it’s quite possible that the extra tabbed pieces of the Spartan are there for lengthening this model to make it the Spartan, but when the Proteus upgrade is confirmed, all the pieces are there to shorten it and change it up for the Proteus instead. But who knows…

The roof of the Spartan has a lot of dressing and accessories to decorate it, but considering there is a sprue labelled as “Tank Accessories”, it makes sense of course that they’re not actually on this particular sprue. So I did have to spend a few minutes peering at all the tiny pieces to find the right numbers and parts I was looking for to finish off the roof, but once done it was just as easy as the rest of the Spartan to piece together, as there were specifically shaped grooves for each separate piece, so there is no chance of you putting something on backwards or upside down by accident.
After the roof I moved onto the rear of the model. The Spartan has four chunky exhausts at the back, and oh boy did I finally find it; the holy grail of the Games Workshop vehicle build - gappage!

The base of the cylinders of the exhausts are supposed to slot easily into the corner, one behind the other, and they did… Too easily… When inspecting why I discovered that the corner cylinders were a lot thinner than the gap they were supposed to be filling, and if I had pushed them right up against the corner it would have left an ugly open space down the sides (which immediately gave me memories of the “Gappage Prince”, otherwise known as the Demon Prince which is so poorly designed that by the end it’s usually more greenstuff than plastic). So to counter this I had to pull them back slightly and press them up against the sides rather than into the corner of the space. It wasn’t too fiddly to do, but it did leave quite a hole on either side. Following this though I then moved onto the exhausts that fit into the tops of these cylinders, and here I found another small challenge to navigate. The back edge of the roof sticks out over the placements for the exhausts by roughly a millimetre. It’s enough to make slotting them into place a little bit fiddly as I found I had to angle them to the side and twist, but it wasn’t too much of a hassle and once past that little lip of the roof they slotted into place quite easily.
Beneath the exhaust cylinders, there are then two pipes and another rear panel to attach. It was a little fiddly to glue the panel on as there aren’t really any tabs or reinforcing pieces like with the sides to attach one panel to the other, but the pipes glued onto this panel and straight onto the underside of the cylinders. It almost seems like they forwent reinforcement here because the pipes exist, but even with the pipes glued into place it still seemed a little more flimsy than I would like. Glueing these parts onto the rear though did cover up the gaps beneath the cylinders, which is nice because it means their existence doesn’t really matter overall as they are now inside the tank, and therefore not visible to anyone who doesn’t know they’re there. And hey, no need to green-stuff either. So win.

Putting the body together was my next challenge as I needed to put the front and rear sections together. Two extra panels were needed to glue in between the rear and front sections I had already built and they again had no reinforcing structure to them, so the moment I put the body down, even on its side, it seemed to collapse in on itself. The build instructions at this point were telling me to move on and attach the tracks to the sides, but I decided to skip this stage for now and glue the sides onto the body to give it all some stability, so I didn't risk ending up with a pile of plastic panels in front of me because it had all collapsed under its own weight.
Once the sides and body were together though I discovered a new problem that I hadn’t anticipated. The sides didn’t actually want to stay put, and they kept pulling away from the body. I had to stop preparing pieces to build to hold the partially constructed model together, squeezing the sides together tightly against the body so gaps didn’t form. I held it for a few minutes, even using the weight of my legs as I sat on the floor to try and press it all together securely as my hands had begun to hurt, but it still didn’t seem enough. So in the end I nabbed Grey to do it for me and had him sit on the sofa for a while with it watching youtube while I continued cutting out and cleaning flash of other parts of the model. I built this model by using Citadel Plastic Glue though, which can take some time to properly set, so this may have been the main contributing factor to the model parts pulling away from each other as they dried and set in place, so it’s something to consider when making this model. This might not occur if you use superglue instead, but it is still something to be wary of.
As Grey sat ‘patiently’ I moved onto the tracks, and this is something I have to say now though about this model; these tracks, are beautiful.

Past vehicles I have built, the tracks have felt so flimsy and despite having a line of tabs running along the inside edge for glueing, they never seemed to sit properly. Even with the tabs, they could easily slide all over the place while trying to fit them in place, and it was always a pain trying to get them all to line up correctly. Gaps would be a problem because one track piece didn’t quite stretch far enough, or you’d reach an angle where you’d need to have the track wrap around the wheels and it would always stick out too far, or not far enough, and just looked odd. But with the Spartan there are two lines of tabs running down the inside edge and each of the wheels on the sides of the tank have specific cut-outs that these tabs fit into quite snugly. Not only this, but the tracks are nice and chonky. They really feel like they have substance to them compared to those of other vehicles, and glueing them into place was again, almost as easy as plug-and-play. They were all just the right size, and when it came to the awkward angles they still just slotted into place easily, neatly hugging the wheels as they should instead of looking like they’re hanging off awkwardly.


With the tracks then in place and a very satisfied me still marvelling at the quality of these pieces, I then decided to move onto the weapons.
Quad-mounted lascannons sound very nice indeed, and they look in the picture like they could do some really meaty damage. The pieces themselves though compared to the rest of this model seem pretty flimsy (though they are from the sprue marked as “Land Raider”, so this might explain why). They’re somewhat easy to put together, with the bulk of the lascannons being made up of the lascannons themselves, as you would expect. These come in two separate pieces which require glueing together near the base of the weapons, but there is a lot of gun there, and not much surface area where they meet, so not much space to actually apply glue to it. All it takes is a gentle nudge while trying to manoeuvre them into place in their rotating cradle and instead of having quad guns pointing forwards towards your enemies, you have two pairs of guns pointing across and almost at each other, which is a little awkward. On top of this there is a tiny, and I mean 'really' tiny piece, that has to be fitted in between the barrels themselves and while I do happen to have little hands myself, even I struggled to get this piece into position. In the end I gave up and gave it to Grey to fit the piece between the barrels, which saved me from having to rummage through the toolbox for a pair of tweezers just for one fleck of plastic.

I got around this problem with the second gun mount by glueing the piece half into place before putting the two halves of the lascannons together, which worked wonders and made me facepalm at why I hadn't considered it beforehand.
With both lascannons built I then fitted them to the Spartan and sat back to gaze at the model in all its glory and feeling, for the most part, how sturdy it all seemed.


I was left though a bit confused by the sprue for the lascannons, as I had built everything according to the build instructions. I was damned sure I had. But there was still a third of the sprue left unused and there was no mention in the build instructions as to what the rest of these pieces were for. But as I had noticed earlier that none of these sprues seemed to have the same labels, and the sprue for the weapon was entirely from the Land Raider sprue, it gives more credence to the theory of the Proteus being a potential future model as there are several parts and weapon options on these sprues that just don’t fit the Spartan, such as a Dozer Blade on the Tank Accessory sprue which has no place on the Spartan, but is clearly a staple of the Proteus.
At the moment though, these extra pieces can make what in most parts is a really easy and clear to understand build pretty confusing, because a lot of the unused gun parts in particular look just like the ones you do use, but they are wrong and clearly don’t fit but it only becomes apparent once you’ve cut them out and tried them. So, it’s a good thing everything is properly numbered (which is something they’ve really managed to do well with this build).
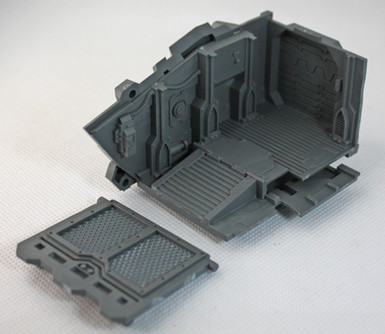
The final stage of this build was simply adding decoration. Everything you need to make your Spartan up as a force of loyalist might or a carrier of heretical traitors can be found on the “Tank Accessory” sprue, and you’re not short of parts with this. Want to display a glorious insignia to show your allegiance? There are plenty to adorn your Spartan. Want to have your tank commander meerkating out of the roof hatch like he’s ready to play whack-a-mole? There are plenty of options for that. Or, if you’re like me, and think keeping your squishy marines inside the armoured carrier they’re driving until they actually reach their destination is the best course of action, you can put a cap on the roof that’s closed (like it should be).

With the Spartan fully together and decorated I was able to properly enjoy the look of it in physical form, rather than just the pictures I'd seen online and on the box. It’s between the sizes of the Land Raider and the Baneblade, so it fits a nice little niche in that department. In terms of build quality though, in my opinion it’s superior to the Land Raider at the very least, and definitely better than the Rhino.
The Spartan is an exceedingly simple vehicle to put together. There are quite a few small parts to it, so there was a lot of cutting out and cleaning of flash, which did cause me a bit of hand cramp as I was working on it. But even with the few breaks I took in between stages because of said cramp, it still went together pretty quickly. It also feels very sturdy, which you would think would give it a degree of weight, but it’s actually surprisingly light for something that feels so robust. It almost gives me the sense that even if I dropped it, it wouldn’t break easily. Which is a nice feeling. (Though I'm not about to try dropping it just for the hell of it, that’d be crazy.)
All in all the Spartan is a very nice build and probably one of the best vehicles i’ve put together so far. It’s well designed, feels very robust, and would easily make a great addition to any army, whether you be a traitorous follower of Horus, or a loyal defender of the God Emperor.
Hi, thank you for reading my article. I hope you enjoyed it and that it was useful to you. Articles like these take a lot of time to research and write, so if you did enjoy it or found it useful maybe you’d be so kind as to drop me a donation. That way I can continue to fund the products and books I need to keep delivering high quality articles like this.
You can donate to me at https://ko-fi.com/graypaints
For updates when I release an article, why not Subscribe and join us on our Social Media pages?
Comentários